Sending Messages to Microsoft Teams with Node-RED
This tutorial shows you how to send inspection notifications from your OV80i camera directly to a Microsoft Teams channel. You'll learn to set up automated alerts that include inspection results and clickable image links, keeping your team instantly informed of production status.
What You'll Build: An automated system that posts OV80i inspection results, including images and pass/fail status, directly into a Microsoft Teams channel.
Real-World Application: Get instant notifications when inspections fail, share inspection images with remote teams, or create automated quality reports in your team collaboration space.
Prerequisites
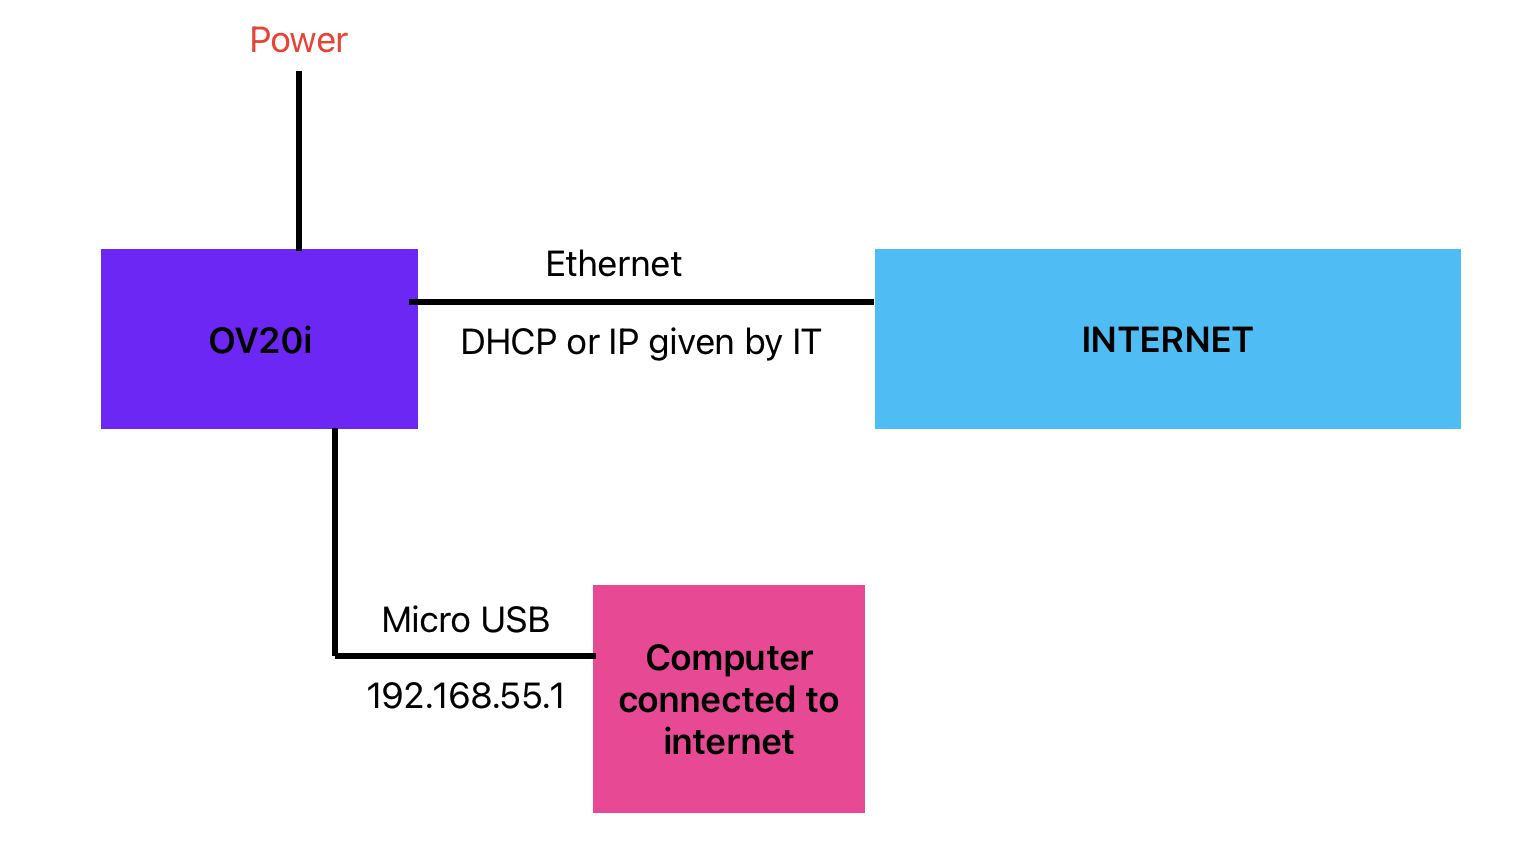
- OV80i camera connected to your plant network
- Microsoft Teams access with permission to add connectors
- Teams channel where you want to receive notifications
- Network connectivity between OV80i and Microsoft Teams
- Basic understanding of Node-RED flows
Tutorial Overview
What we'll build: A Node-RED flow that automatically sends inspection results to Microsoft Teams with clickable image links.
Time required: 15-20 minutes
Skills learned: Teams webhook integration, Node-RED HTTP requests, automated notification systems
Step 1: Set Up Microsoft Teams Webhook
1.1 Access Your Teams Channel
- Open Microsoft Teams and navigate to the channel for inspection notifications
- Click the three dots (•••) next to the channel name
- Select "Manage channel" from the dropdown menu
1.2 Add Incoming Webhook Connector
- Click "Connectors" in the channel management menu
- Search for "Incoming Webhook" in the connector list
- Click "Add" next to the Incoming Webhook option
1.3 Configure Webhook Settings
- Name: Enter a descriptive name (e.g., "OV80i Inspection Alerts")
- Icon: Optionally upload a custom icon for your notifications
- Click "Create" to generate the webhook
1.4 Save Webhook URL
- Copy the generated webhook URL - this is crucial for Node-RED setup
- Save the URL in a secure location (you'll need it in Step 2)
- Click "Done" to complete the Teams setup
Checkpoint: You should now have a webhook URL that looks like: https://yourcompany.webhook.office.com/webhookb2/...
Step 2: Access OV80i Node-RED
2.1 Navigate to Node-RED
- Open your OV80i web interface
- Go to Recipe Editor > IO Block
- Click "Configure I/O" to enter Node-RED editor
2.2 Prepare Your Workspace
- Clear an area in the Node-RED canvas for your Teams integration flow
- Identify the palette on the left side with available nodes
- Plan your flow: Trigger → Process → Send to Teams
Step 3: Build the Node-RED Flow
3.1 Add Required Nodes
Drag these nodes from the palette to your canvas:
- Inject node (for testing)
- Function node (to format the message)
- HTTP request node (to send to Teams)
- Debug node (optional, for troubleshooting)
3.2 Connect the Nodes
- Wire inject output to function input
- Wire function output to HTTP request input
- Wire HTTP request output to debug input (optional)
Flow structure:
Inject → Function → HTTP Request → Debug
Step 4: Configure the Function Node
4.1 Basic Message Configuration
- Double-click the function node to open configuration
- Replace the default code with this basic message format:
// Basic Teams message
msg.headers = {
    "Content-Type": "application/json"
};

msg.payload = {
    text: "You got a new message from your OV80i"
};

return msg;
4.2 Advanced Message with Image Links
For dynamic inspection results with clickable images:
// Dynamic message with inspection image
let imageUrl = msg.payload.image_url;

msg.headers = {
    "Content-Type": "application/json"
};

msg.payload = {
    text: `Inspection Complete - [View Image](${imageUrl})`
};

return msg;
4.3 Complete Inspection Notification
For full inspection details:
// Complete inspection notification
const inspectionData = msg.payload;
const imageUrl = inspectionData.image_url;
const result = inspectionData.result ? "PASS" : "FAIL";
const timestamp = new Date().toLocaleString();

msg.headers = {
    "Content-Type": "application/json"
};

msg.payload = {
    text: `🔍 **Inspection ${result}** - ${timestamp}\n\n[View Image](${imageUrl})`
};

return msg;
4.4 Save Function Configuration
- Click "Done" to save the function node
- Give the node a descriptive name like "Format Teams Message"
Step 5: Configure HTTP Request Node
5.1 Set Up HTTP Request
- Double-click the HTTP request node to configure
- Set Method: Select "POST" from dropdown
- Set URL: Paste your Teams webhook URL from Step 1.4
- Set Return: Select "UTF-8 string"
5.2 Additional Settings
- Name: Enter "Send to Teams" for clarity
- Headers: Leave empty (handled by function node)
- Payload: Leave as "Ignore" (handled by function node)
5.3 Save HTTP Configuration
- Click "Done" to save the HTTP request node
- Verify the webhook URL is correct - this is critical for success
Step 6: Test Your Integration
6.1 Deploy the Flow
- Click "Deploy" button in the top-right corner
- Wait for "Successfully deployed" confirmation
- Check for any error indicators on nodes (red triangles)
6.2 Test with Inject Node
- Click the button on the left side of the inject node
- Check the debug panel (right sidebar) for any error messages
- Verify the message appears in your Teams channel
6.3 Verify Teams Notification
- Switch to Microsoft Teams and check your target channel
- Look for the test message from your OV80i
- Test any clickable links to ensure they work properly
Step 7: Integration with Inspection Flow
7.1 Connect to Inspection Results
To send automatic notifications after each inspection:
- Find your main inspection flow (usually starts with "All Block Outputs")
- Add your Teams notification as a branch from the main flow
- Connect after inspection processing but before final results
7.2 Example Integration Flow
All Block Outputs → [Inspection Logic] → Final Pass/Fail
                                      ↓
                               Format Teams Message → Send to Teams
7.3 Filter Notifications (Optional)
To only send notifications for failed inspections:
// Only send notifications for failures
const inspectionResult = msg.payload.result;

if (!inspectionResult) {  // Only if inspection failed
    const imageUrl = msg.payload.image_url;

    msg.headers = {
        "Content-Type": "application/json"
    };

    msg.payload = {
        text: `⚠️ **INSPECTION FAILED** - Immediate attention required\n\n[View Failed Image](${imageUrl})`
    };

    return msg;
} else {
    return null;  // Don't send message for passing inspections
}
Step 8: Troubleshooting
8.1 Common Issues
| Problem | Symptoms | Solution |
|---|---|---|
| No message in Teams | Debug shows success but no Teams notification | Check webhook URL, verify network connectivity |
| HTTP error 400 | Bad request error in debug | Check message format, ensure Content-Type header |
| Image links don't work | Message appears but images won't open | Verify image URL is accessible from Teams users' network |
| Flow doesn't trigger | No debug output when expected | Check flow connections, verify trigger conditions |
8.2 Debug Your Flow
- Add debug nodes after each step to trace data flow
- Check the debug panel for error messages and data structure
- Test with inject node to isolate configuration issues
- Verify webhook URL by testing with external tools if needed
8.3 Network Connectivity
- Ensure OV80i can reach internet (ping test from camera)
- Check firewall settings that might block outbound HTTPS
- Verify DNS resolution for Teams webhook URLs
- Test from browser on same network as camera
Success! Your Teams Integration is Complete
Your OV80i camera can now:
✅ Send automatic notifications to Microsoft Teams channels
✅ Include clickable image links for immediate inspection review
✅ Filter notifications based on inspection results
✅ Provide rich formatting with inspection details and timestamps
✅ Support multiple channels for different notification types
Best Practices
Message Management
- Use descriptive channel names for different types of notifications
- Include timestamps and station identifiers in messages
- Filter messages to avoid notification overload
- Test thoroughly before production deployment
Security Considerations
- Protect webhook URLs - treat them as sensitive credentials
- Use HTTPS for all communications (default with Teams)
- Limit network access to necessary services only
- Regularly rotate webhook URLs if compromised
Performance Optimization
- Batch notifications if sending many messages
- Use appropriate retry logic for network failures
- Monitor message delivery success rates
- Implement rate limiting to avoid Teams API limits
Next Steps
After setting up Teams integration:
- Create different notification channels for various inspection types
- Set up escalation workflows for critical failures
- Integrate with other team tools (email, SMS, etc.)
- Build dashboards combining Teams with other monitoring tools
- Train your team on responding to automated notifications